Monday, November 18, 2013

Restaurant Review: Pizzeria Bianco, Downtown Phoenix Location

I've put this restaurant review off for a while now. After I got home from vacation life just took off full speed with the millions of things I had to catch up on. Then I got bloggers anxiety. How can I do this restaurant justice in one simple tiny review? But I will try.

Located: 623 E Adams St Phoenix, AZ (602 258 8300)
Hours: Monday 11am-9pm, Tuesday-Saturday 11am-10pm
Website: www.pizzeriabianco.com 


Perfect for: date night, special occasions, girls night, family dinner, casual dining, anyone who enjoys fabulous food made with the finest local ingredients.
Atmosphere: Gorgeous. This is how I want a pizza place to look, truly authentic. Bar Bianco is stunning and sophisticated.
Overall: Highly recommended. I'm jealous there isn't one near me actually.

Pizzeria Bianco is a gem. The food is fresh, locally sourced, and made with heart. But let me back track a bit to how I ended up at this Pizzeria. My family booked a vacation to Sedona, Arizona- a place my mom has always wanted to visit. Just a few days before we left she said to me 'I think my college friend Marco lives in Phoenix now!'- which was quite strange since they went to school in Rochester, NY. So she facebooked him and we arranged to have lunch at his brother's restaurant, a family business of sorts, as Marco is the bread maker- amongst other things. I prodded her: 'make sure he knows I'm vegan'  I didn't want to spring that on him last minute "Oh, everything looks delicious, but I'm Vegan- can you possibly throw something together that I can eat?" That's always a pain in the ass.

The menu is simple, truly Italian. The food is made humbly, with the finest ingredients- and most importantly the food is made with integrity and respect. With more than 25 years under their belts, Pizzeria Bianco has found what works and truly does it right.

The menu consists of 'Small Plates', Salads, the best Pizza you can get your hands on, and house made desserts.

I was impressed to see they had a Marinara Pizza on the menu, which is a delicate crust layered with the most perfectly seasoned tomato sauce, oregano, fresh basil, and thinly shaved garlic slices. I'm accustomed to eating some pretty bland pizza as a vegan (you know the whole- omit the cheese thing), but this was nothing but. I was blown away by the intense flavors in something so simple. In fact, I ate the entire pizza. Yes. The ENTIRE pizza. And I probably would've polished off a second entire pizza if it was sitting in front of me. As I was stuffing my face with each glorious slice Marco told me the story on how the Marinara pizza came to be. The details may be slightly fuzzy but story has it the sailors in Italy couldn't bring cheese or meat pizza with them as they went off to sea because it would spoil quickly, they ended up ditching the toppings and perfected the marinara pizza which wouldn't spoil and kept them well fed. Something like that, right Marco?

He then showed us around the property where they had a Meyer lemon tree, amongst others, and a fresh herb garden with the most gorgeous basil you have every seen. Right next store is a historic little house called Bar Bianco where you can grab a glass of wine or a small plate and wait for your name to be called over at the restaurant. The bar is gorgeous, dark woods scattered with original paintings from the Bianco brothers father. The bar in itself is a find.

Pizzeria Bianco's founder Chris, Marco's brother, won the James Beard Award for Best Chef, and the restaurant itself has been given praise from critics and fellow chefs alike. I asked Marco why the awards aren't hanging up somewhere so people know what they have accomplished, he replied that they're all sitting in a closet. Putting them up on the wall is tacky and pretentious. "People know the food here is great, we don't need to advertise it". And they're right, they don't.

Sorry for the poor quality picture, I rushed and was in the sun- for better pictures visit their instagram!

My brother and I standing in front of the restaurant.

Leftover pizza- that didn't last long- trust me!

The gorgeous Meyer Lemon tree on the side of the restaurant

Bar Bianco

My mom and Marco- they haven't seen each other since college!

Marco picking us some fresh basil to smell from their herb garden.

Bar Bianco

Roasted Radishes

A gorgeous bundle of rainbow radishes came in my food co-op box last week and I was immediately stumped. Eventually a friend suggested I roast them off in the oven, she said they lose that bitter taste and sort of remind her of mini potatoes when they're done. I gave it a go and I was so impressed. Now I'll finally have something to look forward to when I see the radishes in the co-op box again.


1 bundle of rainbow radishes
1-2 tablespoons olive oil
Salt
Herbs de Provence
Optional: Squeeze of lemon

Preheat the oven to 450°F.

Clean the radishes and remove the tops. Cut the larger ones in half and remove any blemishes. Toss them in the olive oil and sprinkle with a pinch of salt. Roast for 15 minutes, or until fork tender, flipping them halfway through. When they come out of the oven sprinkle them with a little herbs de Provence and a squeeze of lemon. Serve warm.

Sunday, November 17, 2013

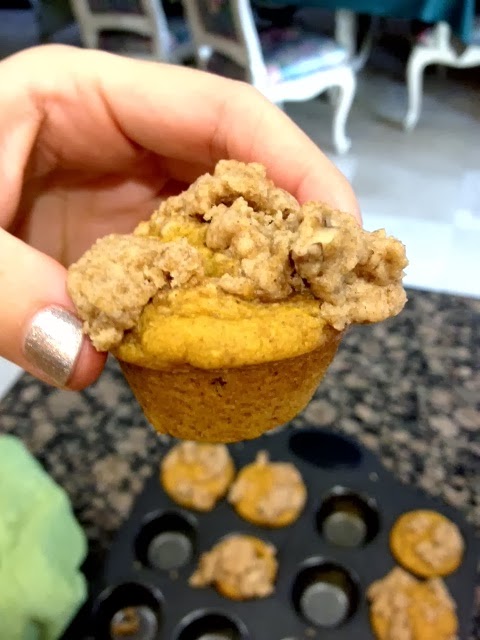
Pumpkin Streusel Coffee Cake Mini Muffins

Yeah, that's a mouth full. Now try saying that with one of these bad boys in your mouth- impossible. I'm not a baker (that's probably evident by now if you follow my blog), but it is the holiday season... and I did have some extra pumpkin puree sitting in the fridge begging to be used. This turned out to be a great coffee cake, not too heavy, not overly sweet. You can make it mini muffin style like I did, or bake it in a cake pan which may be a good option if you plan on serving this to guests- you know, like for thanksgiving!

Streusel
1/2 cup brown sugar
3/4 cup all purpose flour
5 tablespoons plant-based butter, at room temperature
1 teaspoon ground cinnamon
1/2 cup pecans, roughly chopped

Coffee Cake
2 cups all purpose flour
2 1/2 teaspoons baking powder
1/2 teaspoon baking soda
1/2 teaspoon salt
1 1/2 teaspoons cinnamon
1/2 teaspoon ground ginger
1/2 teaspoon nutmeg
1/4 teaspoon clove
1 cup non-dairy milk (I used unsweetened almond milk)
1 teaspoon apple cider vinegar
1 cup pumpkin puree
1/2 cup brown sugar
1/4 cup granulated sugar
1/2 cup canola or vegetable oil


Preheat oven to 350°F.

In a bowl mix together the streusel ingredients until it becomes crumb-like, then set aside.

In a large bowl mix the milk and apple cider vinegar, allow to sit for a few minutes to curdle (it never looks curdled, but don't skip this part, it's important). Meanwhile it's doing its thing, in a seperate bowl sift together the flour, baking powder and soda, salt, cinnamon, ginger, nutmeg, and cloves.

Add the pumpkin, sugars, and oil to the bowl with the milk in it, whisk until smooth, then whisk in the flour mixture. A fork may be easier than a whisk because this mixture gets very thick and you don't want to over mix.

Grease your mini muffin tin or a 9-inch springform/cake pan with a little bit of non stick spray. For the muffins add a little bit of your mix into the muffin holes, then add a thin layer of streusel, and then some more mix, then finish it off with some streusel crumbles over top. If you're doing this in a cake pan then pour in half your batter, sprinkle it with half the streusel, and then pour over the remaining batter, topping it off with remaining streusel before popping it into the oven. Bake the mini muffins between 17-20 minutes, or until a toothpick comes out clean when you poke a muffin, allow to cool before serving. Bake the cake for roughly 50 minutes, or until a toothpick comes out clean after poking it in the center of the cake.

If you're looking for a little more sweetness, you can then drizzle it with a maple glaze. I don't think a glaze is necessary so I opted out, but if you're interested here is the original recipe.

Thursday, November 14, 2013

Yard House Mac and Cheese: Vegan Style

I've never been to Yard House but apparently their Mac and Cheese is on point. My friend Anna veganized their recipe and passed it on to me. It is so damn good. Seriously. Delicious. My brother insists I make it as a side dish for Thanksgiving, and although that won't be happening I will be making this again as a quick and easy dinner.

1 lb elbow/shell pasta
3 tablespoons butter
1/4 cup flour (or chickpea flour if you're GF)
3 cups plant-based milk (I used the carton coconut milk because I had it on hand, but almond or soy would work as well)
8 ounces Pepper Jack Daiya wedge or shreds
8 ounces Cheddar Daiya wedge or shreds
1 cup bread (preferably day old sourdough/bakery breads)
2 boxes Crimini mushrooms
Salt and Pepper
Pinch of Cayenne pepper
2 teaspoons garlic powder
Optional: Bacon Bits (yes, they're vegan! Crazy, huh?)
Optional: Truffle Oil

Preheat the oven to 350°F.

Cook the pasta until slightly under done, then drain and set aside.

Cut the cheeze wedges into little cubes, set aside. Take the bread and place it in a food processor and blend until crumbly, set aside.

In a large sauce pain melt the butter over medium heat, once melted whisk in flour and cook for 1-2 minutes. Whisk in milk, bring to a boil and remove from heat- add the cheddar and jack handfuls at a time along with salt, cayenne, and black pepper to taste. Once all the cheese is melted pour the pasta into the sauce. It's going to look like an absurd amount of sauce, but it works out perfectly, have some faith.

Lightly spray a casserole dish with nonstick spray, pour the cheesy pasta and all of the sauce into the casserole dish. Toss your bread crumbles with the garlic powder and layer it on top of the pasta and bake for 20 minutes.

While your pasta is baking, quarter the mushrooms and saute them for just a couple minutes, so they still have a nice bite to them but have lost much of their water weight. When the pasta comes out of the oven serve it with a scoop of the mushrooms, optional bacon bits, and a drizzle of truffle oil.

*I made this again with 6 oz daiya mozzarella shreds, 2 oz daiya cheddar shreds, and 8 ounces daiya pepper jack shreds and it was so insanely good. Almost like a more 'sophisticated' mac, but that's just my opinion!

Monday, November 4, 2013

Savory Holiday Tart

My friend Erica recommended this recipe to me, in fact she swore by it. I took a look at the recipe and quickly decided I'd give it a go, mainly because the ingredients were common and it looked super easy- I didn't expect it to blow me away though. I was blown away. This tart was so delicious, ridiculously flavorful, and light- almost fluffy. This is definitely going to be the GF main dish this Thanksgiving.


1 1/2 tablespoons olive oil
1 cup onion, diced
3/4 cup celery, diced
5 cloves garlic, minced
1/2 teaspoon sea salt
1/4 teaspoon freshly ground black pepper
1 14-ounce can chickpeas, rinsed (reserving 1/4 cup)
3/4 cup raw walnuts
2 tablespoons fresh lemon juice
3 teaspoons tamari, soy sauce, or Bragg's Liquid Aminos
1 1/4 cups frozen chopped spinach
3 1/2 tablespoons dried cranberries
1/4 cup fresh parsley, chopped
1 tablespoon fresh thyme, chopped
1 9-inch prepared pie shell, thawed (I used a GF one)
1/2 tablespoon olive oil

Served with some homemade cranberry sauce and gravy (gravy not shown)
 Precook the pie crust according to package directions.

Preheat the oven to 400°F. Heat 1 tablespoon of olive oil to a saute pan and add the onion, celery, garlic, salt, and pepper, and cook for 9 minutes until onions soften and begin to caramelize. Remove from heat and set aside.

In a food processor add chickpeas (except reserved 1/4 cup), walnuts, lemon juice, and 2 teaspoons of the tamari/soy sauce/liquid aminos, and pulse to lightly chop. Remove half of chopped mixture from food processor and transfer to a large bowl. Transfer the sauteed onion mixture into the food processor with the remaining chickpea mixture and puree until smooth.

Transfer purée to bowl with lightly chopped chickpea and walnut mixture. Add spinach, cranberries, parsley, thyme, and 1/4 cup of reserved chickpeas. Stir to combine and transfer to prepared pie shell, spreading evenly. Mix together the remaining 1/2 tablespoon of olive oil with the remaining 1 teaspoon of tamari/soy sauce/aminos, then carefully brush the top of the tart with the mixture. Put a crust-protector, or tin foil around the crust, and bake for 45 minutes. Allow to cool slightly before you cut it. Serve with cranberry sauce and gravy.

Recipe by Dreena Burton

Garlicky Artichoke Dip

My mom makes this famous artichoke dip which has been passed down to me and has become a tradition on Thanksgiving. Unfortunately it wasn't plant-based and because of that I had to recreate it with other non-dairy ingredients. I can't say I recreated the dish, but I made a damn good dip that got the stamp of approval from the family.

2 cans artichoke hearts
6 tablespoons plant-based mayo
10-14 garlic cloves (did I mention this is garlicky?)
1 cup nutritional yeast

Rinse the artichoke hearts and place them in a food processor along with the remaining ingredients, give it a few pulses until all the ingredients are incorporated. You don't want to puree this, the dip is best with chunks of artichoke still in it- so take it easy with the food processor. Spray a small casserole dish with non-stick cooking say and spoon your dip into it. Bake covered at 350°F for 15-20 minutes, then remove the cover and bake for another 5. Serve warm with crackers for dipping!

*Sorry, I was so eager to dig right in that I completely forgot to take a picture!

Sunday, November 3, 2013

Creamy Pumpkin Pie

I'm always on the hunt for the perfect recipes for baked goods as I am not a natural baker. I found this one and it's like the recipe creator new I hated baking... It is so beyond easy. Only downside is I skipped over the recommended homemade crust and used a store bought one. And although it was still delish, I think I may have to take the plunge and make the crust from scratch next time I make this.


 Filling:
1/4 cup maple syrup
3 tablespoons cornstarch (or arrowroot powder)
2 1/4 cup canned pumpkin puree (not pumpkin pie filling)
1/2 cup brown sugar
1/4 cup full-fat coconut cream (this is the thick white stuff that floats on top of the clear liquid when you open up a can of coconut milk, just skim it off)
1 tablespoon plant-based butter
2 teaspoons vanilla extract
2 teaspoons ground cinnamon
1/2 teaspoon ground ginger
1/2 teaspoon nutmeg
Pinch of ground cloves
1 Store bought pie crust, or follow this recipe for the homemade GF crust that sounds divine

In a large mixing bowl whisk together the maple syrup and cornstarch until well combined. Then add in the pumpkin, sugar, coconut cream, butter, vanilla extract and spices and whisk until it is smooth and creamy. Follow the instructions for your pie crust, mine recommended poking it with fork marks and baking it at 350° for 8 minutes. Once I took it out I poured in my pumpkin filling, lined the edges of the crust with a crust-protector (you can use tin foil), and baked it at 375° for 45 minutes, then removed the crust-protector and continued baking for another 15 minutes. Allow for the pie to cool for 1 hour, then place the pie in the fridge to cool for a minimum of 3 hours, or overnight. Do not skip that last step! I popped each slice in the microwave for a few seconds before serving.


Recipe from Oh She Glows